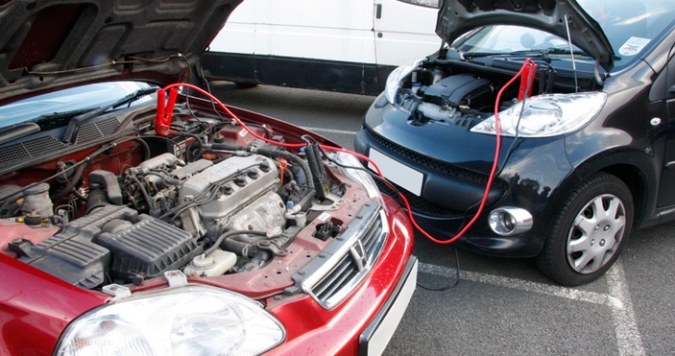
How to Jump Start a car battery
If your car doesn’t start, the most likely cause is a dead battery. Being stranded with a lifeless car is never fun, but getting back on the road is relatively easy. Whether it’s to avoid being late for work, or to escape a hoard of zombies, every driver should know how to jump a car.
Step 1: Get a set of jumper cables
Make sure to carry a set of jumper cables in your car at all times, just in case. Any set will do the job but look for cables gauge 4 to 6 in size, with a length of 10 to 20 feet. Cables of that size should be durable enough to work reliably, and a relatively long length allows flexibility, in case you can’t park another car right next to the one being jumped. You don’t want cables that are too long, though, as the extra distance electricity has to travel may decrease the strength of the charge.
Portable jump-starters are also available, but the batteries that power them must be kept charged in order for them to work.
Step 2: Find a power source
You’ll need to park the running vehicle close enough to the one being jumped for the cables to reach from battery to battery, so identify where the battery is located in each vehicle. Batteries are usually mounted in the engine compartment, toward the front, but that isn’t always the case. They may be obscured by plastic covers, which need to be removed before jumping, located in the trunk, or under the rear seat. Familiarizing yourself with all of this beforehand will help save you time when you actually need to jump a car.
Step 3: Connect the jumper cables
Once the running vehicle is maneuvered into position, shut it off and open both hoods. Now it’s time to break out the jumper cables.
When handling jumper cables, make sure to keep the red (positive) and black (negative) clamps from touching each other. Once electricity starts flowing through the cables, this will create sparks and could lead to a short circuit in one or both of the vehicles. Having one person at each end of the cables can make the whole process easier.
The clamps connect to battery terminals, which are exposed to metal nodes with wires connected to them. Before connecting the cables, make sure to brush away any dirt or grime to ensure a good connection. Confirm which terminal is positive (+) and which one is negative (-). You’ll normally find each symbol on the battery itself, next to the terminal. Sometimes the positive is under a red cover. Ask for help when in doubt; it will save you a potentially costly repair bill.
Connect one of the red clamps to the positive terminal of the dead battery. Then, connect the other red clamp to the positive terminal of the live battery. Next, connect a black clamp to the negative terminal of the live battery. Instead of connecting the second black to the negative terminal on the dead battery, find an unpainted metal surface on the vehicle and connect it to that instead. This will make jumping safer.
Step 4: Fire it up
Start the functioning car, then try to start the dead car. If the car refuses to start, the battery may be too far gone, in which case it may need a replacement or simply more time to charge. If interior lights come on, or you hear the engine try to start and fail to catch, you may have other problems.
If the jump is successful and your car fires up, leave it running while you disconnect the cables. Making sure not to let the clamps touch while any part of the cable is still attached to the battery, disconnect the clamps in the reverse order of how they were attached, starting with the black clamp clipped to the car being jumped, and ending with the red clamp on the positive terminal of that car’s battery.
Once the cables are disconnected, keep your car running. You need to give the battery enough time to recharge, so a short drive should do the trick.

Do you have any news or article you would like us to publish? Kindly reach us via outreach@t4d.co.ke or howtodoafrica@gmail.com.


